Thursday, December 19, 2013

More Cotton!

A couple months ago, I posted about a cotton project we did where we harvested the cotton from our school garden, deseeded it, and learned all about the cotton process.

Well, our awesome garden educator Mrs. Breed-Parks came up with this fantastic idea of actually using the cotton we picked and making something out of it!  She decided we could make paper out of the cotton, and then create ornaments (for the ECC's craft fair) from the paper.  I thought this was a terrific idea, because it would show the students how cotton comes full circle from plant to product.

So we blocked a couple days this last week before winter break to partner up with Mrs. Breed-Parks and our art teacher Mrs. Schepker-Mueller to whip up some handmade cotton paper.  For those who are wondering, here's the steps we took to create our paper:
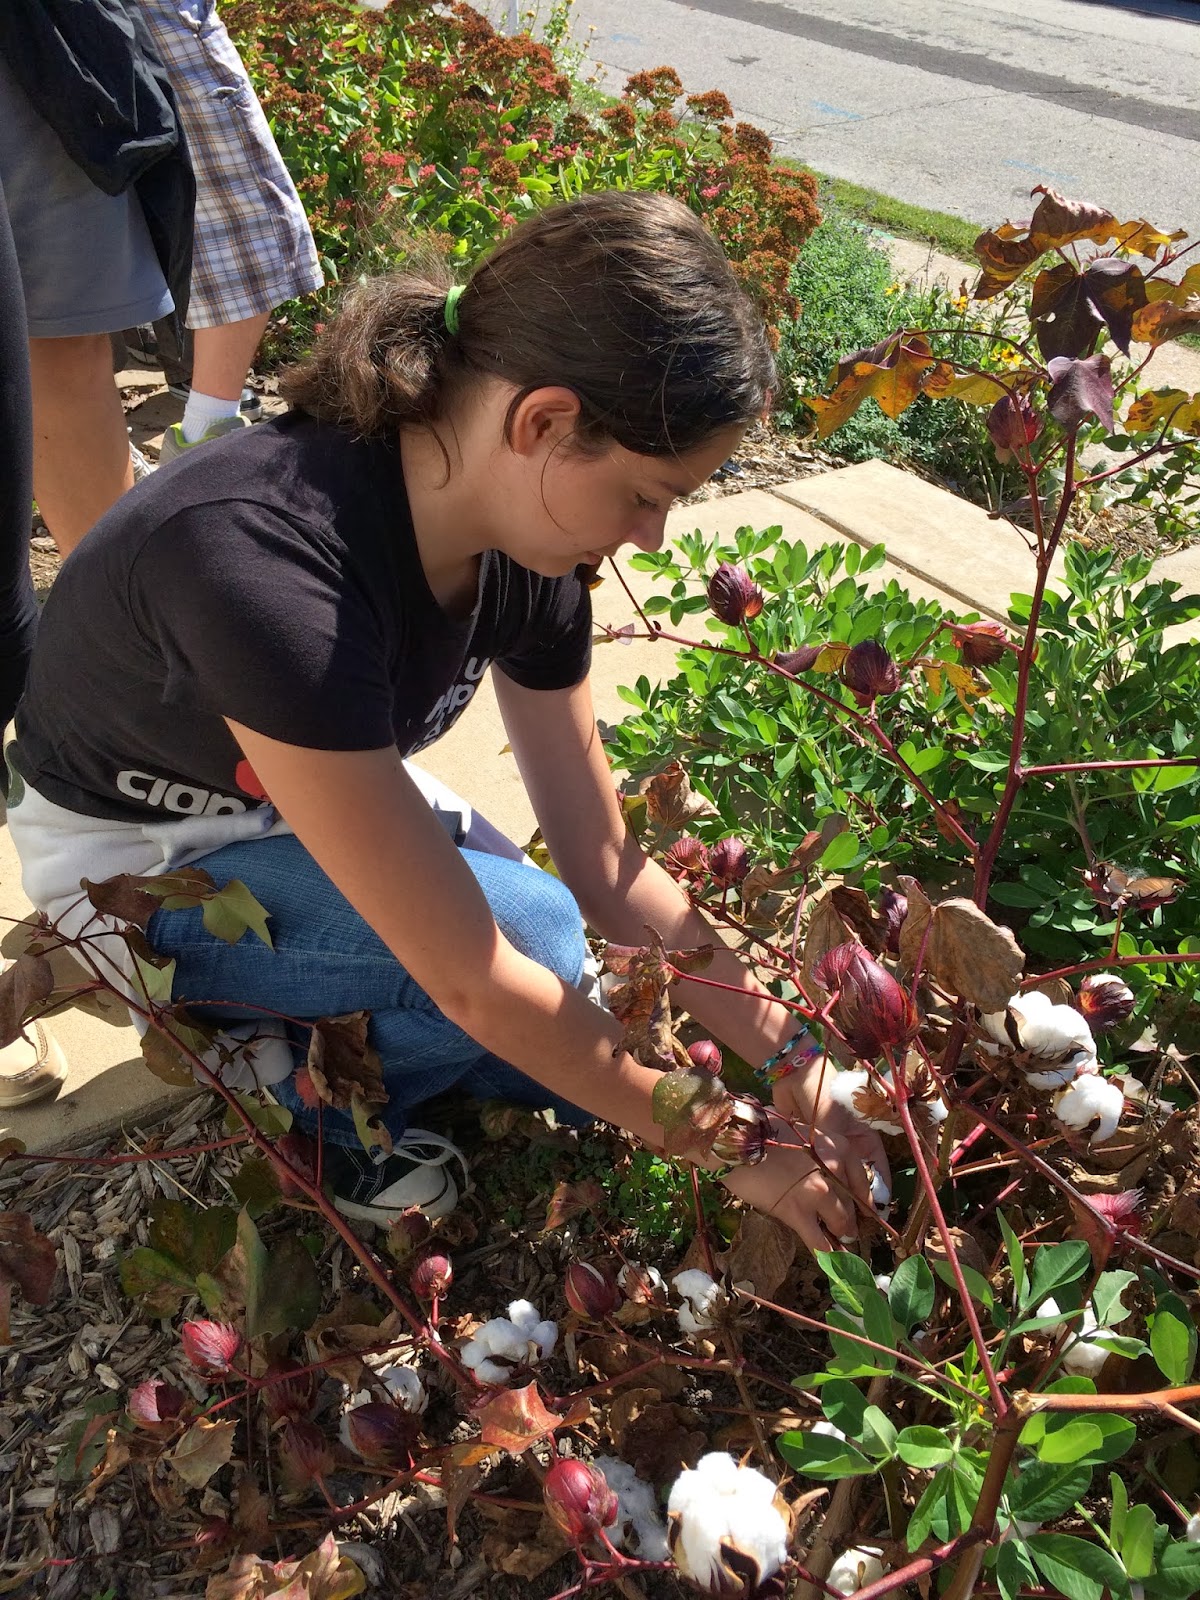
  1. You pick the cotton from the plant.
  2. You pull the cotton from the burr so you just have the cotton boll.
  3. You then de-seed the cotton and pick all the "trash" (leaves, etc...) out of the cotton so you have clean cotton.  The seeds you keep separate so you can replant them and grow more cotton plants next year!
  4. Once you have the clean cotton, you have to wisp it--you pull it apart into tiny wisps.
  5. When you have your wisps made, then you use scissors to cut the wisps into even smaller parts.
  6. You then cut up colored paper (depending on what color paper you want to make) into tiny squares: this is used as filler for your cotton paper you will make.
  7. You then put your cut up cotton wisps, colored paper, a little corn starch mixture, and water into a blender (you can add flower seeds to the mixture as well too--that way, once you're done with your paper ornament, you can actually plant your ornament in your yard and flowers will grow!).
  8. You blend the mixture up (adding more water so it's like the consistency of a smoothie) for about a minute until it's all the same consistency.
  9. You then pour the paper mixture out on a screen and press out all of the water as you're smoothing out your paper onto the screen.
  10. You let it dry for a day and then your paper is ready to be made into whatever you want to craft it into...like an ornament!  You can decorate it with paint, markers, colored paper, glitter, whatever you want!
The students really had a great time learning about the paper making process (and seeing the cotton that they picked come full circle into a product).  They made some really cool ornaments from this paper that really show their creativity.

Check out the pics below for the whole cotton paper making process and the products they produced!  Enjoy!


Thursday, December 12, 2013

Active Citizen Project 2013

Two years ago, the 8th graders (in the 2011-2012 class) did our first Active Citizen Project.  It was a huge hit: The Patch did a story on them, equal rights groups posted their gay-rights commercial, and the students really enjoyed picking from a "menu" of project options.

This project challenges students to showcase their knowledge from our government unit in a way that shows how they are members of a participatory democracy.  Combining our objectives, tech skills, and real-world knowledge, students set out to show their active membership in our democratic society.

So before winter break, we wrapped up our government unit with this same project, with a few modifications to update some of the tech pieces to 2013 standards.  The students were challenged with picking two to three projects from the project menu that added up to 100 points.  There were many different project choices the students could pick from (check out the options below), and they were given a few days in class to work on their projects (as well as whatever they needed to finish up at home) to get their projects completed.  This time, to turn in their projects, students created an "Active Citizen Project" folder in their Google Drive, shared it with me, and the uploaded all of their projects to this folder whenever they finished them.


Overall, (once again!), I was completely blown away by the projects these students created.  The political cartoons were great, the commercials were informative and engaging, and the letters were heart-felt and about real issues that were important to the students.  Check out a sampling of some of the projects below.  Enjoy!


Monday, December 9, 2013

MRH Community Tech Project

In technology we just recently finished up our MRH Community Tech Projects.  Students were tasked with creating a video (using iMovie) that documents the aspect of the MRH Community that they chose to highlight in their movie.


Students could pick from the list of aspects to make their movie centered around that included MRHMS' metaphor: School as Expedition, MRH's cornerstone program, MRHMS club day, MRHMS adventure club, MRHMS' sustainability program, MRHMS' home visit program, Joe's Place, or MRHMS' bee and garden program.

Students set out and found pictures and videos to use in their movie along with student and staff interviews they set up and wrote questions for.

Overall, these MRH community videos were excellent!  Last year's tech class set high standards to what I was expecting and this year's class really lived up to my expectations.  Check out a few of their community videos below!


Saturday, November 23, 2013

3 Branches of Government Project

In social studies we are currently waist-deep in our Early American Government Unit.  We have just learned about the separation of powers, checks and balances, and 3 branches of government system we have here in the US and where it came from (Articles I, II, & III of the US Constitution!).

Students were challenged to create their own project that detailed our government system in a medium that they felt would best showcase their learning and understanding of this concept.  They could choose from an iMovie, cartoon, song/rap, news article, or an infographic (check out the full project details here).  Once students decided on what project they were going to do, they set out to create their project that showcased all about the 3 branches of government.

First off, the variety and creativity of the projects that were turned in was astounding; not one project was like another (I love this!!), yet they all included the same information, material, and concepts!  I really love project-based learning, and I feel like this project definitely hit on that concept.  Students were able to choose a project medium that they could present their information and knowledge in the best possible way.

Anywho, check out a few of the various projects from below!  I hope you'll enjoy them--and find them as informative!--I sure did!


Monday, November 4, 2013

Infographic Project

In tech, we have started looking at infographics and what they're used for.  We found out that infographics are a fun and quick way to learn about a topic without a ton of heavy reading.  

Students were then given this project. They had to create their own infographic on one of the four topics they were able to pick from.


Students then used the free site infogr.am to create their own interactive infographics. Check out some of the infographics below that students created! Once again, I'm so impressed with the things these students can create when given a piece of technology to use!


Constitutional Convention Video Challenge

In social studies we have been completely immersed into our Early American Government unit.  Lately we have been looking at the creation of our Constitution (and other important docs that have shaped the US) and the Convention where it all began.

I remembered a couple years ago we did a Lewis and Clark Expedition Video Challenge in our Manifest Destiny unit, and I thought that a similar challenge would be a great learning activity for the students to do now!

Therefore, I created the Constitutional Convention Video Challenge.  Taking all of their knowledge, notes, and readings on the Constitutional Convention, students were tasked with creating a video (using iMovie) that included all of the following information below about the Constitutional Convention.


Students had to have their movie uploaded to our class YouTube channel by 5pm on the day they started working on their project (I gave them a little extra time after their class ended because it does take a little bit to export the video and upload it to YouTube).  Check out some of the students' videos below.  Keep in my they only had about 45 minutes in class to create these...but I am once again impressed with what these students can come up with!


Monday, October 28, 2013

Articles of Confederation Children's Book

Recently we have just started our second unit in social studies, Early US Government.  One of the first things we look at is the Declaration of Independence, and then we move to (what I call it) the "rough draft" of the US Constitution: the Articles of Confederation.

We spent a day talking about what exactly the Articles were and why they only "worked" for a short time.  Students were then challenged with this project: they had to create a children's book detailing what the Articles of Confederation were.


Check out the links below to a few of the books the students created!  Overall, I was very impressed with the quality of these children's books--especially taking 18th century text and rewriting it into kid-friendly language that elementary school students could understand.  Enjoy!


Thursday, October 24, 2013

Hero Project


In tech we have just completed another project--this one was all about a hero!  The students really had a great time with this project: it pulled together different tech elements (wordle, Google presentation/Keynote, Hero Machinedafont, and many others) in a creative fashion to have students create a presentation detailing all about their hero!


Check out the entire directions/project requirements here.

The students got to present their heroes to the class when they were finished...and each and every hero was unique and different and awesome!  Check out some of the presentations below from our hero project!  Enjoy!


Friday, October 11, 2013

Teaching #throughglass 2

Remember my first "Teaching #throughglass" post earlier this school year?  I said I was going to do a series of what it is like to see the classroom (or in this instance the outdoor classroom!) through the teacher's eyes as filmed by using Google Glass.

I have just added my second teaching #throughglass video to my blog series; however, this one is quite a bit different than my previous video.  This one captures what it's like for a teacher to go on a single day expedition (field trip) with a group of 8th graders.  Since our motto at the middle school is "School as Expedition", we take a lot of "expeditions" to various places for various lengths of time.  This particular expedition we took half of our 8th graders to Forest Park to do a fish sampling and data collecting expedition.  Below in my second teaching #throughglass video you'll see a 12+ minute glimpse of what it's like for a teacher to be on a single-day expedition with middle school students...stay tuned later in the year for a glimpse into what's it's like on a multi-day overnight expedition!  Enjoy!


Wednesday, October 9, 2013

Cotton!

In social studies we decided to do a mini-unit (3 days only!) on cotton since our awesome garden here at MRH has cotton!  We partnered up with our awesome gardener Mrs. Breed-Parks and we learned a lot about cotton: where it comes from, how to pick and harvest it, and what can be done with after it's been picked.  Cotton was a huge industry during the colonial era--done mostly by slaves, but others (from all different races) throughout the US (and well into the 20th century) picked cotton as well.

We started our mini Cotton unit off with a view from Mr. Dan.  Mr. Dan is one of our awesome bus drivers/buildings and grounds guru here at MRH, and along with fighting in the Vietnam War, he also picked cotton on a farm when he was a boy!  Check out his story below:


After hearing from Mr. Dan and his experiences, students set out in groups to read about all of the uses and production capabilities for cotton.  We then headed out into the garden to actually look at how our cotton here was growing and then we got to pick it and de-seed it.


We then headed back inside to actually pick out the seeds of the cotton (which hasn't been done for many centuries, thanks to the invention of the cotton gin in the late 1700s).  Students really liked finding all of the seeds in the fluffy cotton--we are saving the seeds to plant more cotton next spring!


Overall it was a great mini-unit for the students.  I think a lot of them thought cotton picking was only done by slaves--and although a good portion of it was--it was actually done by people of all races and ethnicities.  We briefly touched on slavery in our American Revolution unit, and we'll circle back to it again in our Civil War unit as well.  This was just a great opportunity for students to get to hear from a real-life cotton picker and see what cotton looks like and how it's picked in person.

Friday, October 4, 2013

Scratch


In tech class this past week the students have been making their own games on this awesome site called Scratch (read more about Scratch for Educators here).  It actually is a website hosted by MIT that allows you to write your own scripts/codes for different games, projects, animations, videos, and much more!  You can create your own account, save your work, and explore other projects that others have created.  What's really cool is that you can "look inside" everyone else's project to see their script and codes they used to make their project, game, etc... work!  And the best part: it's free!

I really can't speak highly enough about this site: it really is a super cool game-making (or basically any web-based project you want to do which has you coding everything you want it to do manually) site that teaches you as you are building.  It has a very easy user-interface, and a really nice help feature to do everything from a basic overview of how to use it to in-game help when you're stuck with your script.

I created the how-to video below to help my students get started, and then the rest has been on them!  The coolest part is that the students have become the teachers (because I'm by no means an expert on this site) and they're the ones volunteering to help their peers when they have a question about their game or how to use Scratch (which is probably the coolest thing to see as a teacher!).


Today the students shared the games they've been working on this past week, and once again, I was super impressed with how they turned out!

Check out the links below to play the games my students created!  I hope you'll be as impressed as I am!


Thursday, October 3, 2013

Plant Family Posters

A while back in tech the students made some awesome plant family posters (and I forgot to blog about them!).  We partnered with our awesome gardener Mrs. Breed-Parks for this project.  She wanted some informational posters about the different plant families (and the types of plants that are in them) that we have in our gardens here at MRH.

Students were paired up in teams of 2 and they were each given a plant family.  Everything from Amaranthaceae to Solanaceae! (Yeah, I have a hard time pronouncing those too!)  Students then headed out to the garden to take pictures of the plants in their family--because the best resources are the ones you gather yourself!

Once students got all of their pictures taken, they then used the template Mrs. Breed-Parks created for them to fill with their information and pictures of the plants in their family.

Check out the posters they created below!  Super awesome work!


Tuesday, September 24, 2013

Scooter the Dog

I've been doing this blog for several years now and it just occurred to me that not once have I ever given a pitch about my beloved dog Scooter!  Now just wait, before you go judging me about this being a "school" blog and I'm posting about my dog, I promise there is an academic undertone to this post...so stay with me.

First, if you haven't already, check out my pup Scooter on Facebook, Twitter, and Instagram.  You will not be disappointed, I promise (at the very least, it's always fun to look at his pics for a good laugh, especially on Mondays).

I have been blessed with the most patient dog in the entire world.  Seriously.  Here's a few pics to prove it to you:


So it's obvious I like capturing images (hence most of my blog posts include some sort of picture or video), and hopefully by seeing those pics it's really obvious to you that I love taking pictures of my dog (and son) posing for all sorts of pictures.

After having tons and tons of "Scooter pictures" at my disposal, I decided to actually do something with them (this is where the academic part comes in!).  I've written 3 "Scooter the Dog" children's iBooks that are available for FREE on iTunes for you to download onto your iPad, iPhone, or Mac, and another few iBooks that are on their way to the iTunes store soon once they've been approved by Apple.  These are children's books, with an age-level roughly around preschool and early elementary (although my 4 month old son loves to have these read to them, and I've had high schoolers enjoy reading them too! (probably because of the pictures!)).  This is a new hobby that I am really enjoying.  I've always wanted to write a novel, and decided to start small with doing some children's books first with my own "illustrations" before I tackle my novel idea.  Anyways, if you like to read, or like to read to little ones, check out these books!  I hope you'll enjoy them (click the links below to go to iTunes to that book) and following Scooter along on his many adventures and journeys.


Related Posts Plugin for WordPress, Blogger...