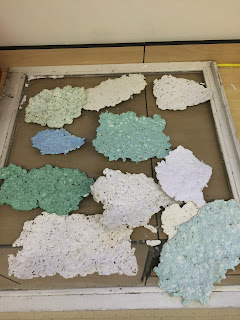
Well, our awesome garden educator Mrs. Breed-Parks came up with this fantastic idea of actually using the cotton we picked and making something out of it! She decided we could make paper out of the cotton, and then create ornaments (for the ECC's craft fair) from the paper. I thought this was a terrific idea, because it would show the students how cotton comes full circle from plant to product.
So we blocked a couple days this last week before winter break to partner up with Mrs. Breed-Parks and our art teacher Mrs. Schepker-Mueller to whip up some handmade cotton paper. For those who are wondering, here's the steps we took to create our paper:
- You pick the cotton from the plant.
- You pull the cotton from the burr so you just have the cotton boll.
- You then de-seed the cotton and pick all the "trash" (leaves, etc...) out of the cotton so you have clean cotton. The seeds you keep separate so you can replant them and grow more cotton plants next year!
- Once you have the clean cotton, you have to wisp it--you pull it apart into tiny wisps.
- When you have your wisps made, then you use scissors to cut the wisps into even smaller parts.
- You then cut up colored paper (depending on what color paper you want to make) into tiny squares: this is used as filler for your cotton paper you will make.
- You then put your cut up cotton wisps, colored paper, a little corn starch mixture, and water into a blender (you can add flower seeds to the mixture as well too--that way, once you're done with your paper ornament, you can actually plant your ornament in your yard and flowers will grow!).
- You blend the mixture up (adding more water so it's like the consistency of a smoothie) for about a minute until it's all the same consistency.
- You then pour the paper mixture out on a screen and press out all of the water as you're smoothing out your paper onto the screen.
- You let it dry for a day and then your paper is ready to be made into whatever you want to craft it into...like an ornament! You can decorate it with paint, markers, colored paper, glitter, whatever you want!
The students really had a great time learning about the paper making process (and seeing the cotton that they picked come full circle into a product). They made some really cool ornaments from this paper that really show their creativity.
Check out the pics below for the whole cotton paper making process and the products they produced! Enjoy!


No comments:
Post a Comment